

How To Install Microsoft Office Document Imaging In Windows 10
Office Professional 2010 Office Professional Plus 2010 Office Standard 2010 Office Starter 2010 More...Less
INTRODUCTION
Microsoft Office Certificate Imaging (MODI) is removed in Microsoft Part 2010. This article provides methods you lot can follow to install MODI on the calculator. Information technology as well describes the alternative methods that y'all tin use to regain the functionalities of certain MODI features.
To install Microsoft Part Document Imaging (MODI) for use with Microsoft Office 2010, use i of following methods.
Method ane: Download and install MDI to TIFF File Converter
To download and install MDI to TIFF File Converter, go to the following Microsoft website:
Download MDI to TIFF File Converter
Method 2: Install MODI by installing SharePoint Designer 2007
SharePoint Designer 2007 is provided as a free download from the Microsoft Download Center. To download SharePoint Designer 2007 and only include MODI during the installation, follow these steps:
-
Review, and so have the software license.
-
Click Customize to open the installation options.
-
On the Installation Options tab, click the down arrow and select Not Available for these 3 sections:
-
Microsoft Function SharePoint Designer
-
Office Shared Features
-
Office Tools
-
-
Expand Role Tools.
-
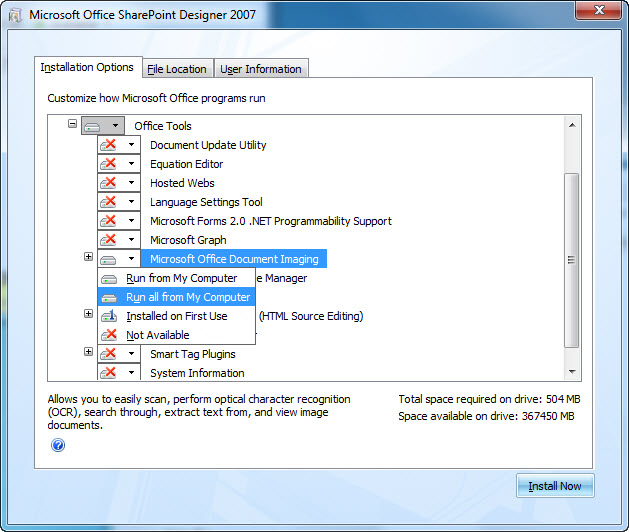
Click the down pointer for the Microsoft Role Document Imaging option, and then select Run all from my figurer.
-
Click Install At present, and then click Close.
Screenshot displaying the location of MODI during a SharePoint Designer 2007 installation:
To start Microsoft Office Document Imaging, follow these steps:
-
Click Starting time, and so select All Programs.
-
Click Microsoft Office, and then select Microsoft Office Tools.
-
Click Microsoft Function Certificate Imaging.
Method 3: Install MODI with the 2007 Office Organisation media
To use MODI in the 2007 Office System together with Part 2010, follow these steps:
-
Outset the 2007 Office System setup procedure.
-
Review, and then accept the software license.
-
Click Customize to open the installation options.
-
On the Installation Options tab, click the downwardly pointer and select Non Available for all sections.
-
Expand Office Tools.
-
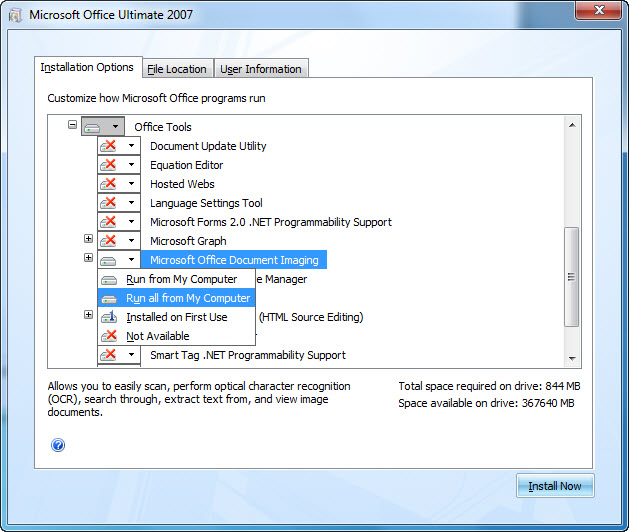
Click the downwards arrow for the Microsoft Office Certificate Imaging option, and and so select Run all from my computer.
-
Click Install At present, and then click Close.
Screenshot displaying the location of MODI during the 2007 Role organization installation:
To starting time Microsoft Office Document Imaging, follow these steps:
-
Click Start, so select All Programs.
-
Click Microsoft Function, and so select Microsoft Office Tools.
-
Click Microsoft Office Certificate Imaging.
Note: No back up is provided for side-by-side installations of 64-bit and 32-bit editions of Office. For more information near 64-bit editions of Function 2010, visit the following Microsoft web site:
64-bit editions of Office 2010
Note: A repair of Office 2010 may need to be done after installing MODI when using Role 2007 media. For more than information on how to use Part 2010 with other versions of Office installed, click the following article number to view the commodity in the Microsoft Knowledge Base:
2121447Information nigh how to use Part 2010 suites and programs on a computer that is running another version of Office
More Information
If you cannot install MODI by using one of the methods that are provided in the "Resolution" section of this article, there are some alternative methods that you can utilise to regain some functionality that was provided by Microsoft Role Certificate Imaging.
Microsoft Part Certificate Scanning
The Microsoft Office Document Scanning component of MODI is used to scan documents and to make documents available on your computer past using any scanner that is installed. To scan documents, use the Windows Fax and Browse service. For more than information nigh the Windows Fax and Scan service, visit the following Microsoft websites:
Send a fax
Set your computer to send and receive faxes Note If you employ a tertiary-party scanning software or a scanning software that is included with your scanning or printing device, you should contact your device manufacture for more information.
Microsoft Office Document Prototype Author print driver
The Microsoft Role Certificate Image Writer print commuter is included in MODI. This driver enables you to save any Microsoft Part document in the .tiff format or in the .mdi format. We recommend that y'all use the Microsoft XPS Document Author printer driver or the Windows Fax Printer driver. For more information about the Microsoft XPS Document Writer, visit the post-obit Microsoft websites:
Almost the Microsoft XPS Document Writer
Print to the Microsoft XPS Document Author
View .tiff files or .mdi files
If you want to view .tiff files, apply one of the post-obit applications:
-
Windows XP: Windows Moving-picture show and Fax Viewer
-
Windows Vista and later versions: Windows Photo Viewer or Windows Photo Gallery
Currently, there is no viewer available from Microsoft to view .mdi files in Office 2010. To open up an .mdi file, either use a third-party converter or catechumen the file to the .tiff format and then view the file in MODI from Office 2003 or from the 2007 Office System.
Optical character recognition
MODI likewise enables y'all to perform optical graphic symbol recognition (OCR). By performing OCR, you can then re-create text from a scanned image or from a fax into another location. To implement the functionality of this characteristic, use Microsoft OneNote 2010. To do this, follow these steps:
-
In OneNote 2010, on the Insert tab, click Picture.
-
Locate and then open the scanned file. The file is inserted into OneNote 2010 as a motion picture.
-
Right-click the picture, click Copy Text from Picture, and and then paste the information to another location.
OneNote 2010 uses the XPS Document Writer printer driver to print to OneNote.
iFilter
119591 How to obtain Microsoft support files from online services Microsoft scanned this file for viruses. Microsoft used the most current virus-detection software that was available on the date that the file was posted. The file is stored on security-enhanced servers that help prevent whatsoever unauthorized changes to the file.
Live Meeting
Previously, Microsoft Alive Meeting used MODI to upload a Microsoft Word document to a coming together. Now, Alive Coming together installs a version of the MODI printer driver. For more information, click the post-obit article number to view the commodity in the Microsoft Knowledge Base:
940842 You cannot import documents into a meeting afterward you lot install the Windows-based Alive Meeting 2007 client
Source: https://support.microsoft.com/en-us/topic/install-modi-for-use-with-microsoft-office-2010-4fbd3076-6d01-9cb7-c574-3bbabc9eead9
Posted by: blackmonpossell.blogspot.com
0 Response to "How To Install Microsoft Office Document Imaging In Windows 10"
Post a Comment